This series of blog posts will share some of the pitfalls associated with the process of signing an internal iOS app for distribution via an MDM like VMware AirWatch. Part 1 here covers the Apple Developer Enterprise Account and certificate generation. Part 2 covers the creation of App IDs and Provisioning Profiles. Part 3 covers the entitlements.plist and info.plist files. Part 4 covers the actual signing process.
 One of the primary functions of any mobile device management (MDM) is to distribute custom iOS apps to device fleets, but making this happen is not always straightforward. In order to distribute a custom enterprise app, it first has to be signed. Most developers of internal apps don't sign them for internal distribution because Apple requires the certificate to belong to the organization deploying the app, not the developer developing it.
While that sounds simple on the surface, it can quickly get confusing. There are several components that you have to understand to even get to a point where you can sign an app. There are developer certificates, app IDs, team IDs, and provisioning profiles. Understanding the role each of these plays in the app re-signing process can help you avoid issues down the line.
Apple Developer Account
Before you can do any of these things, you have to register for an Apple Developer Account. This should be simple: complete an application, pay some money, and you're off to the races, right? Not always. First, make sure you're applying for the right kind of developer account. To distribute internal apps, you want an Enterprise account (https://developer.apple.com/programs/enterprise/ as of this writing).
Next, because Apple is very protective of its ecosystem, the verification process for developer accounts is strict and – as a result – has some pitfalls.
First, Apple uses Dunn & Bradstreet to confirm the business entity. If you're a new company, you may not have a D&B profile yet. If you're established, you may find that the D&B information is no longer valid. Correcting these issues requires that you sign up for D&B's iUpdate service (https://iupdate.dnb.com), which itself requires validation that can take some time. Once registered, changes to things like your address can take 30 days or more.
Second, Apple is particular about the business contacts. Authorization must be provided by an employee of the applicant company. If that's not the person filling out the form, you can experience delays while Apple contacts that person. Since validation usually happens with a phone call, be very careful about what contact information you put. We've had clients put main switchboard phone numbers in and end up in a never-ending back-and-forth where Apple says it tried to call but the call never made it to the authorized contact.
Bottom line, get this squared away well in advance of any distribution deadlines. Best case scenario, it's a week-long process, but if there are issues with validation, you can be looking at a drawn-out back-and-forth.
Certificates
Okay, you've made it through the validation gauntlet and have your shiny new developer account. Progress! Your next step is to request the certificate that will be used to sign your apps. This process starts with the generation of a Certificate Signing Request (CSR), which must be done on a Mac.
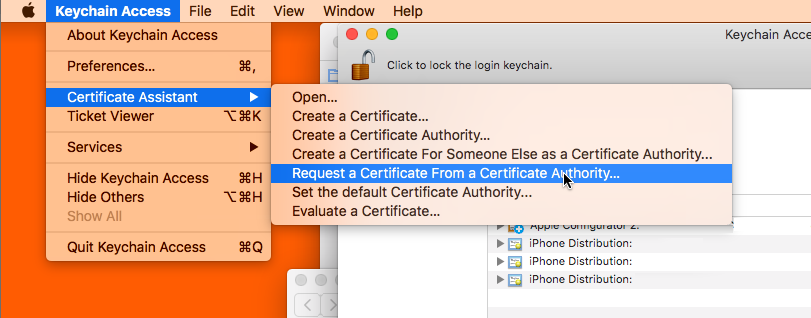
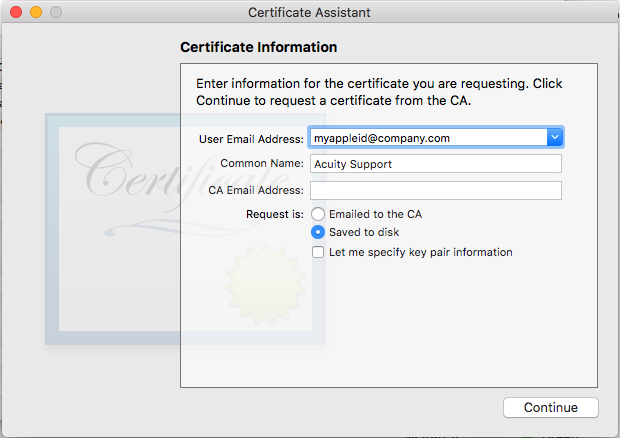
First, open the Keychain Access application, then use the menu to choose "Request a Certificate from a Certificate Authority…" Put in your Apple ID email address, and select for the request to be "Saved to disk." When you click Continue, save the CSR somewhere.

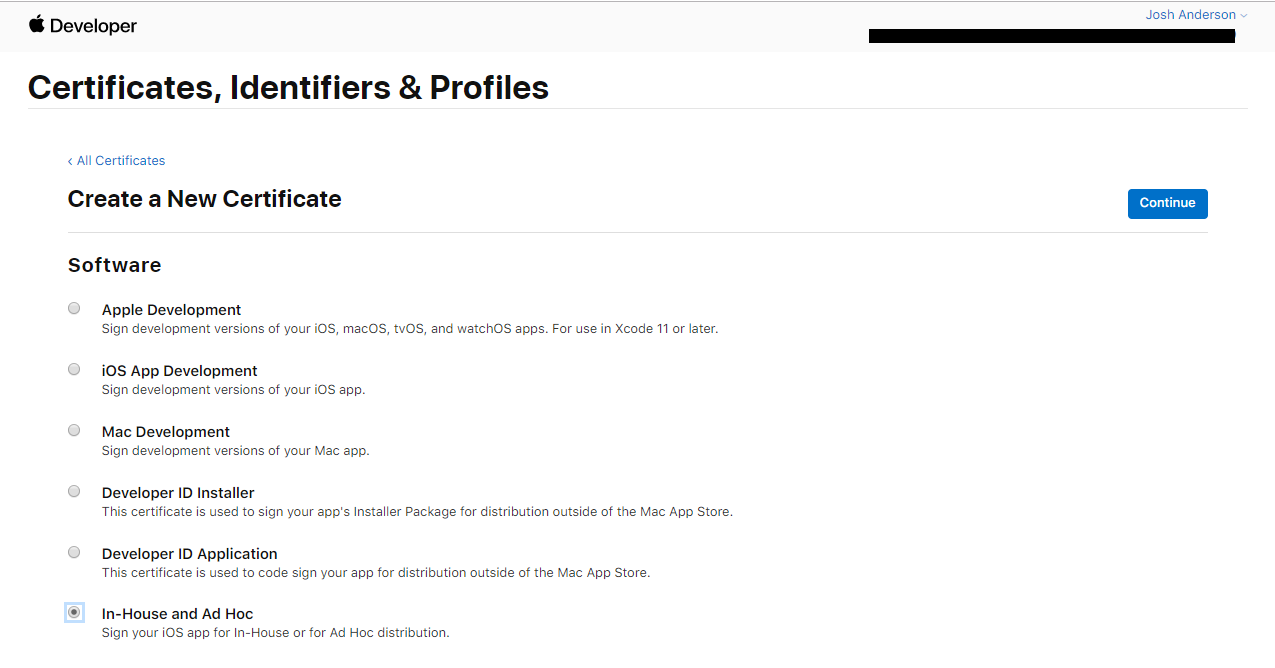
Next, log into the Apple Developer portal and navigate to "Certificates, IDs & Profiles." You'll start on the Certificates page and can start the process by clicking the blue plus circle at the top. You'll be prompted to select the type of certificate you want to create. In this case, we're talking about distributing an enterprise iOS app via MDM, so we'll choose "In-House and Ad Hoc." Next, you'll be prompted to upload your CSR. Use the file you generated in the previous step.

Your certificate will be generated and you'll be able to download it. Go back to the Keychain Access app on your Mac and go to File > Import Items and choose that downloaded certificate.

You should now see in your "My Certificates" section of Keychain Access a certificate named "iPhone Distribution: [Your company name]."
Certificate Expiration Strategies
You probably noticed that the certificate you just created has an expiration date three years out. This fact merits a quick comment about certificate management. Because all iOS apps must have valid associated certificates, you must make sure to stay ahead of the expiration date of your certificates. If you don't, then you risk your app disappearing from users' devices when the clock runs out.
The enterprise developer account allows up to two certificates, so what we usually do for our clients is generate a second, new certificate 4-6 months before expiration of the original. Then, as their developers release updates, we sign those with the newer certificate. In this way, the app certificate is replaced as part of the normal update cycle rather than in an emergency when the app disappears. Then, once all apps are moved over to the newer certificate, the old one can expire with no ill effects.
Next Up
So you've got your developer account and certificate. Now you're ready to set up your app IDs and provisioning profiles. In part 2 of this series we'll go through how to do that. If you’ve already read enough to know that you don’t want to get your hands dirty, talk to us about our Mobility Managed Services offering. Our MMS clients enjoy full management of private app signing and deployment.